

Table of Contents
Introduction:
In today’s digital age, where our inboxes are inundated with a constant stream of emails, managing our email correspondence efficiently has become more crucial than ever. Fortunately, email filters offer a powerful solution to this challenge. Email filters are like virtual assistants, automatically sorting, organizing, and prioritizing incoming emails based on predefined criteria. Whether you’re looking to streamline your inbox, prioritize important messages, or reduce clutter, email filters can significantly enhance your email management experience. In this article, we’ll explore the importance of email filters, how they work, and their various uses in optimizing email productivity.
What is Email filters?
Email filters are rules or criteria set up within an email system to automatically sort, organize, prioritize, or take specific actions on incoming emails based on predefined conditions. These conditions can include sender, recipient, subject line, keywords, attachments, or other characteristics of the email.
Filters can perform various actions such as:
- Labeling: Emails can be automatically assigned labels or categories based on certain criteria. For example, all emails from a particular sender can be labeled as “Work” or “Personal.”
- Prioritizing: Filters can prioritize emails based on importance. For instance, emails from your boss or a specific client can be marked as high priority.
- Sorting: Emails can be sorted into folders or tabs based on predefined criteria. For instance, emails related to newsletters can be automatically sorted into a “Promotions” folder.
- Flagging or Marking: Emails that meet certain conditions can be flagged, starred, or marked for follow-up, making them easier to identify.
- Archiving or Deleting: Filters can automatically archive or delete emails that meet specific conditions, helping to keep your inbox clutter-free.
- Forwarding or Redirecting: Emails can be forwarded or redirected to another email address based on predefined criteria. For example, you can automatically forward emails from a specific sender to your assistant.
Email filters are essential for managing large volumes of emails efficiently, saving time, and ensuring that important messages are not missed. They are typically configurable within email clients or services such as Gmail, Outlook, or Thunderbird.
Steps to create a email filters in cpanel
Log in to cPanel: Open your web browser and navigate to your cPanel login page. Enter your cPanel username and password to log in.
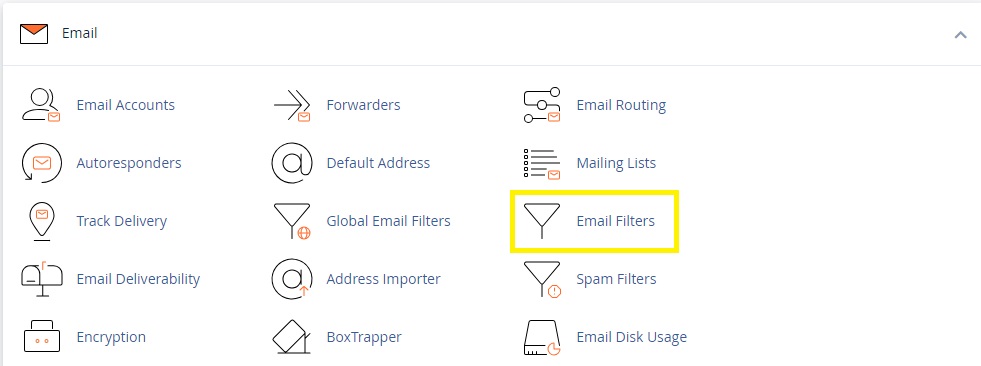
Access Email Filters: Once logged in, locate the “Email” section in cPanel. Depending on your cPanel theme, you may find the “Email Filters” icon directly or under the “Email Management” category. Click on “Email Filters” to access the email filtering interface.
Choose the Domain: If you have multiple domains associated with your cPanel account, select the domain for which you want to create email filters from the drop-down menu.
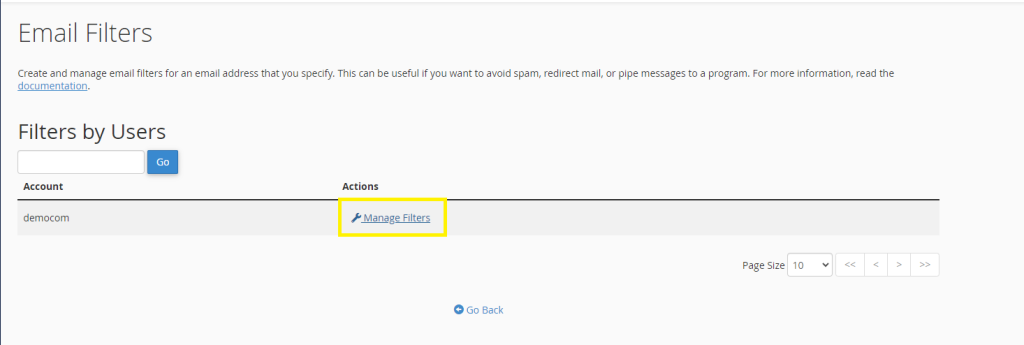
Create a New Filter: In the “Filters” section, you’ll see an option to “Create a New Filter.” Click on this button to begin creating a new email filter.
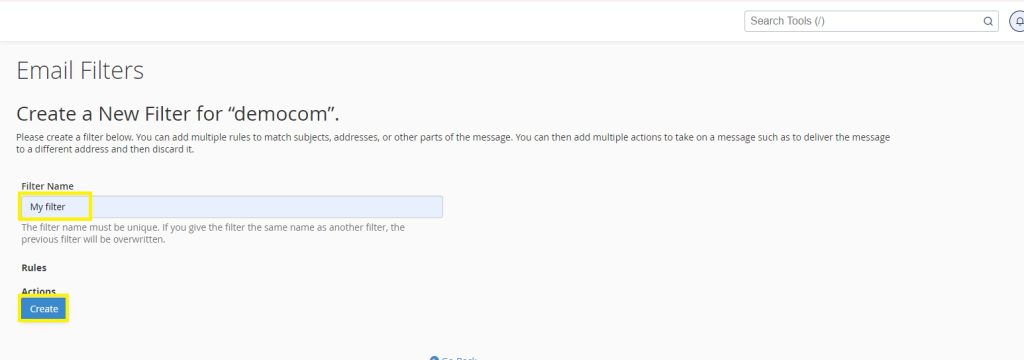
Define Filter Rules: You’ll be presented with fields to define the rules for your email filter. Here’s a brief explanation of each field:
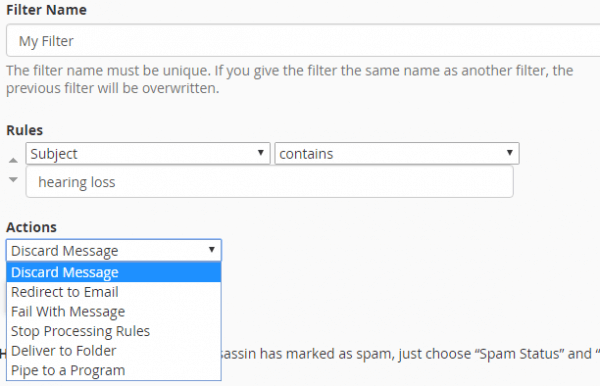
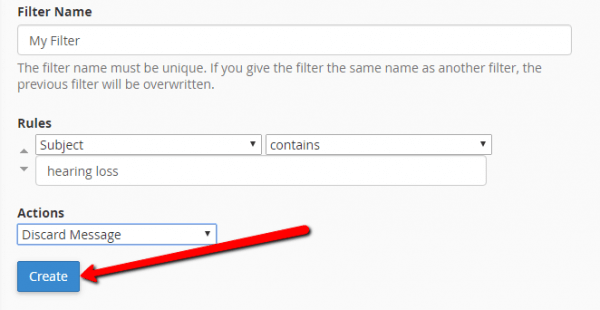
- Filter Name: Enter a name for your filter to help you identify it later.
- Rules: Define the conditions that incoming emails must meet for the filter to take action. This includes criteria such as “From,” “To,” “Subject,” “Contains,” etc.
- Actions: Specify the action(s) to be taken when an email matches the defined rules. Actions may include “Discard Message,” “Redirect to Email,” “Pipe to a Program,” etc.
Add Rule: Click on the “Add Rule” button to add additional rules if needed. You can create complex filters by combining multiple rules.
Set Actions: After defining the rules, choose the action(s) you want the filter to take when an email matches those rules. Select from options such as “Discard Message,” “Redirect to Email Address,” “Forward to Email Address,” etc.
Save the Filter: Once you’ve defined the rules and actions for your filter, click on the “Create” or “Save” button to save the filter.
Verify and Test: It’s a good practice to test your filter by sending test emails that match the defined rules to ensure that the filter functions as expected.
Manage Filters: After creating filters, you can manage them from the “Email Filters” interface in cPanel. You can edit, delete, or disable filters as needed.
That’s it! You’ve successfully created an email filter in cPanel to manage incoming emails based on specific criteria.
Conclusion:
In conclusion, email filters stand as indispensable tools in the arsenal of modern email management. By leveraging the capabilities of email filters, users can regain control over their inboxes, effectively prioritize their communications, and streamline their workflow. From organizing emails into folders to flagging important messages for immediate attention, email filters empower users to tailor their email experience according to their preferences and priorities. As we continue to navigate the ever-growing volume of digital communication, email filters remain a vital resource for maintaining efficiency, productivity, and sanity in the realm of email correspondence.